Homemade Fannie Mae Caramels
Growing up in the Midwest, a box of Fannie Mae caramels was the ultimate special occasion treat in our home. The first time I made these homemade versions, the familiar buttery aroma filled my kitchen and transported me straight back to childhood. While candy-making might seem intimidating, this recipe breaks it down into simple steps that deliver professional-quality caramels with that signature creamy, chewy texture that made Fannie Mae famous.
Add this site as a preferred Google source!
Why This Recipe Works
The secret to these caramels’ exceptional texture and flavor lies in the precise combination of sugars and dairy. Using both sweetened condensed milk and regular milk creates the perfect creaminess, while the gradual cooking process allows the sugars to caramelize properly without burning. The slow cooling period is equally important, allowing the caramels time to develop their signature chewy yet soft consistency that melts in your mouth.
Ingredients
For the Caramels
- Sugar – Forms the base of the caramel and provides sweetness
- Light corn syrup – Prevents crystallization and creates smooth texture
- Sweetened condensed milk – Adds creamy richness and helps achieve proper consistency
- Milk – Provides additional creaminess and helps control thickness
- Whipping cream – Creates the luxurious mouthfeel of professional caramels
- Butter – Contributes rich flavor and velvety texture
- Vanilla extract – Enhances the caramel flavor with aromatic warmth
- Chopped nuts – Optional addition for texture and flavor contrast
For Finishing (Optional)
- Wax paper squares – Alternative for wrapping individual pieces
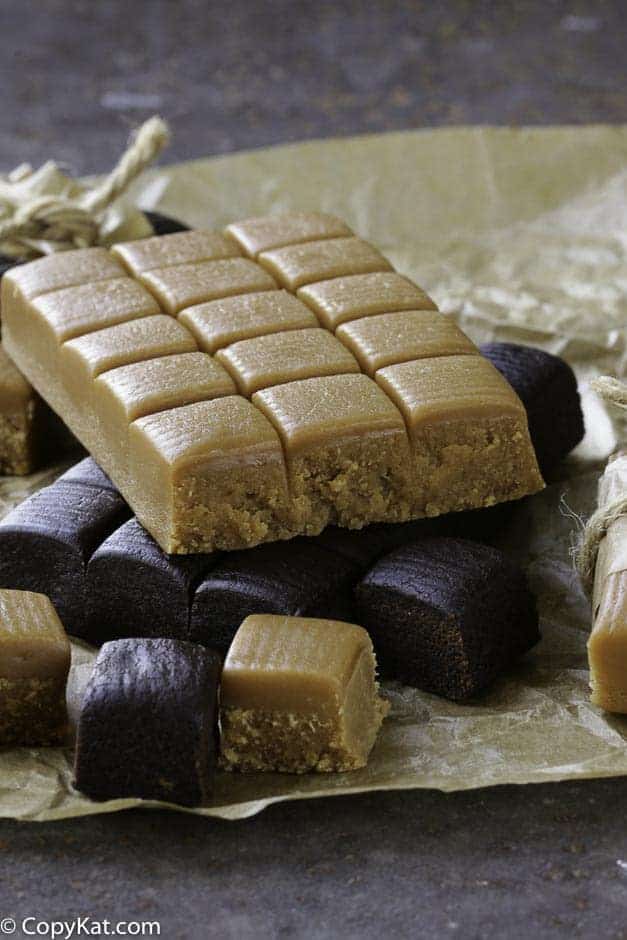
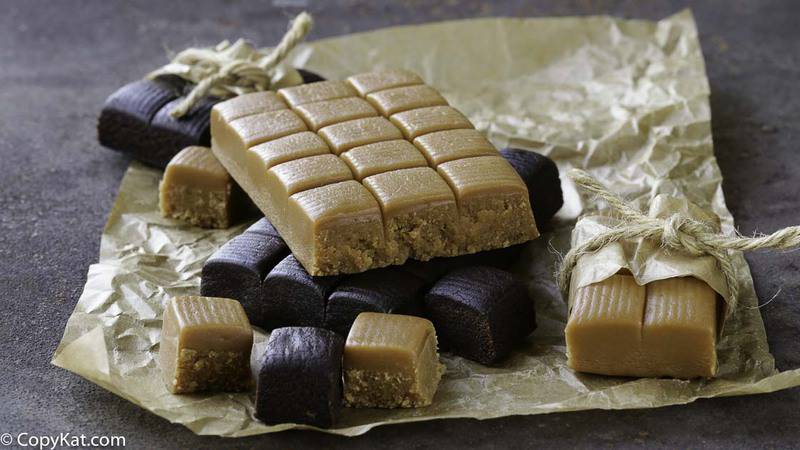
- Tempered dipping chocolate – Creates a professional chocolate-covered caramel
Instructions
Preparing the Pan
- Generously butter a 9×13 baking pan
- Set aside in a draft-free area of your kitchen
Making the Caramel
- In a heavy 6-quart Dutch oven, combine sugar, corn syrup, sweetened condensed milk, milk, whipping cream, and butter
- Place over medium heat and stir occasionally with a wooden spoon until mixture comes to a boil
- Attach a candy thermometer to side of the pot, ensuring tip doesn’t touch bottom
- Reduce heat to medium-low to maintain a steady simmer
- Stir constantly with a wooden spoon, scraping the bottom and sides to prevent scorching
- Cook until mixture reaches 240°F (soft ball stage)
- Remove from heat immediately
- Stir in vanilla extract and nuts (if using)
- Pour mixture into prepared pan without scraping pot (any scorched bits will affect texture)
- Allow caramel to cool at room temperature
Setting and Cutting
- Let caramels set overnight at room temperature
- Once completely set, cut into 1-inch rectangles or squares
- Wrap individually in wax paper squares or dip in tempered chocolate
Plus you’ll get great new recipes from us every week!
Fannie Mae Caramels
Equipment
Ingredients
- 2 cups light corn syrup
- 14 ounces sweetened condensed milk
- 1 1/2 cups milk
- 1 cup whipping cream
- 1 cup butter
- 4 cup sugar
- 2 teaspoon vanilla
- 2 cup chopped nuts if desired
- Tempered dipping chocolate if preferred or wax paper cut into rectangles
Instructions
- Butter a 9X13 baking pan. In heavy 6 quart Dutch oven, combine sugar, corn syrup, condensed milk, milk, cream and butter. Place over medium heat and stir occasionally with wooden spoon until comes to boil. Clip on candy thermometer.
- Please note it can take the sugar a long time to reach the proper temperature, be patient.
- Cook stirring constantly until reaches 240 degrees or soft ball stage. Remove from heat. Stir in vanilla and nuts. Pour without scraping into pan. Allow to stand overnight. Cut into 1-inch rectangles or squares. Wrap in wax paper or dip in chocolate.


Amen! As a Fannie Mae fan, these hit the mark. I made them several times last year and am again this holiday season!
Always test your candy in a cup of ICE WATER. Drizzle a teaspoon or so into the cold water and give it a few seconds to cool. Reach in and shape into a ball and check the consistency ~ you can carefully dry if needed. If it feels like the firmness you prefer ~ pull them off the stove and add your Vanilla. Works every time.
I used to work at Fannie Mae in Chicago. And I have! made these. They are just like the ones in the Store!