


It happens every year. Girl Scout cookie season ends, and I’m left staring at an empty Tagalongs box, already counting the months until those irresistible chocolate-covered peanut butter cookies return. One particularly desperate July, after dreaming about Tagalongs for the third night in a row, I decided to take matters into my own hands.
This post contains affiliate links. As an Amazon Associate, I earn from qualifying purchases.
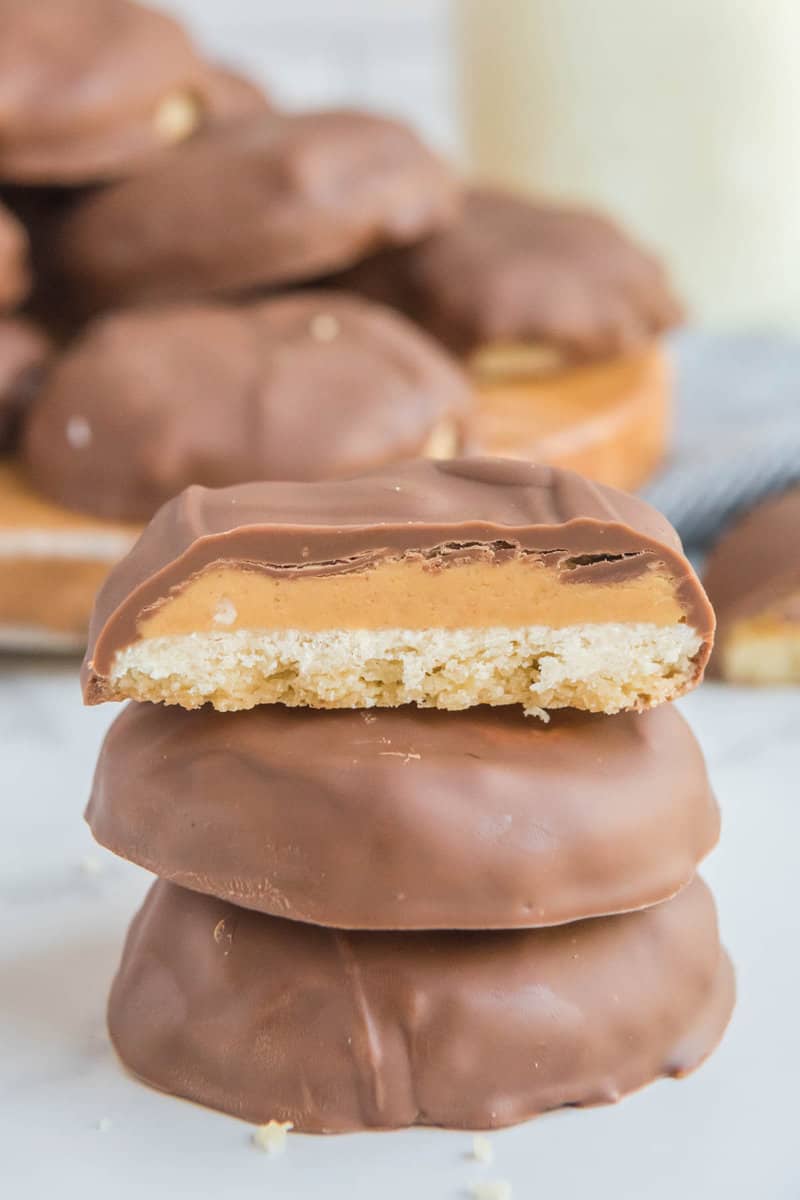
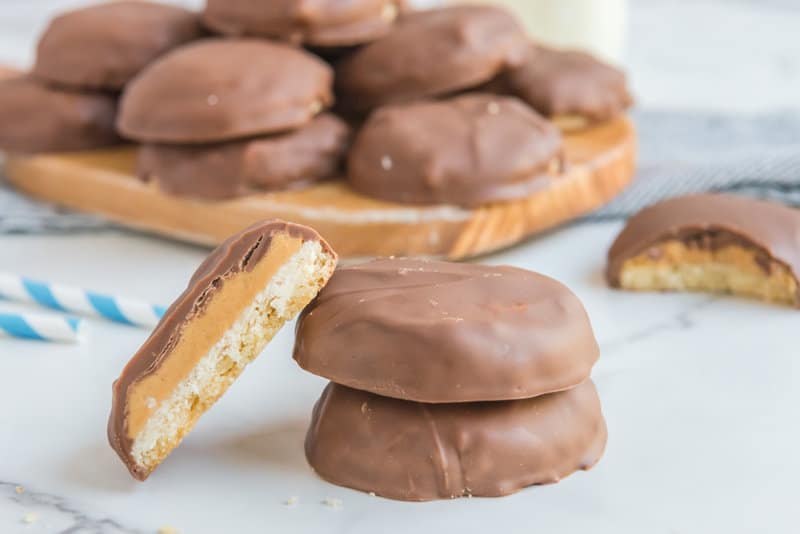
After several trials (and delicious errors), I perfected this copycat recipe that many friends swear tastes even better than the original. The secret? A softer, more tender cookie base thanks to the addition of an egg in the dough. While traditional shortbread is deliciously crisp for dunking in tea, the slightly softer texture in these homemade Tagalongs creates the perfect foundation for that creamy peanut butter layer and chocolate coating.
Table of Contents
Why This Homemade Version Outshines the Original
These cookies aren’t just a suitable replacement for the Girl Scout version – many tasters prefer them for several reasons:
- Softer, more tender cookie base – The egg in the dough creates a more pleasant texture than traditional shortbread
- Fresher ingredients – No preservatives or stabilizers needed for extended shelf life
- Customizable – Adjust the peanut butter thickness, choose your preferred chocolate, or add extra touches
- Always available – Satisfy your Tagalong craving any time of year
- Cost-effective – Make an entire batch for the price of a couple of boxes
- Great activity – Fun baking project to share with kids or friends
Girl Scout Tagalongs Ingredients
For these cookies, you’ll need:
For the Cookie Base:
- All-purpose flour – Provides structure and tenderness for the cookie base
- Salt – Enhances flavors and balances sweetness
- Unsalted butter – Creates rich flavor and tender texture in the cookies
- Sugar – Adds sweetness and helps with browning
- Egg – The secret ingredient that makes these cookies softer than traditional shortbread
- Vanilla extract – Adds depth of flavor to the cookie base
For the Peanut Butter Filling:
- Creamy peanut butter – Creates the signature creamy layer that defines Tagalongs
- Powdered sugar – Sweetens and thickens the peanut butter filling
- Unsalted butter – This makes the filling smoother and more spreadable
For the Chocolate Coating:
- Milk chocolate chips – Provides the classic sweet chocolate exterior
- Vegetable oil – Helps thin the chocolate for easier dipping and creates a smoother finish
Chocolate wafer melts are an excellent substitute for chocolate chips since they are specially formulated for coating baked goods and won’t melt if left out at room temperature. If you use chocolate wafer melts, you may need to reduce your vegetable oil.

How to Make Copycat Girl Scout Tagalongs Cookies
To mix the dough for Tagalongs:
- Line a rimmed baking tray with parchment paper. Keep it handy for later.
- In a mixing bowl, whisk the flour and salt and put aside.
- Combine the butter and sugar in a stand mixer bowl. Use a paddle attachment on a medium setting to incorporate the ingredients. Continue to mix until the butter lightens in color and the volume increases. If you don’t have a stand mixer, you can use a hand mixer.
- Add the egg and vanilla extract to the creamed butter. Mix on a medium setting to thoroughly distribute the egg.
- While the mixer is running, add half of the whisked flour and salt. Once you can’t see any patches of flour, add the other half.

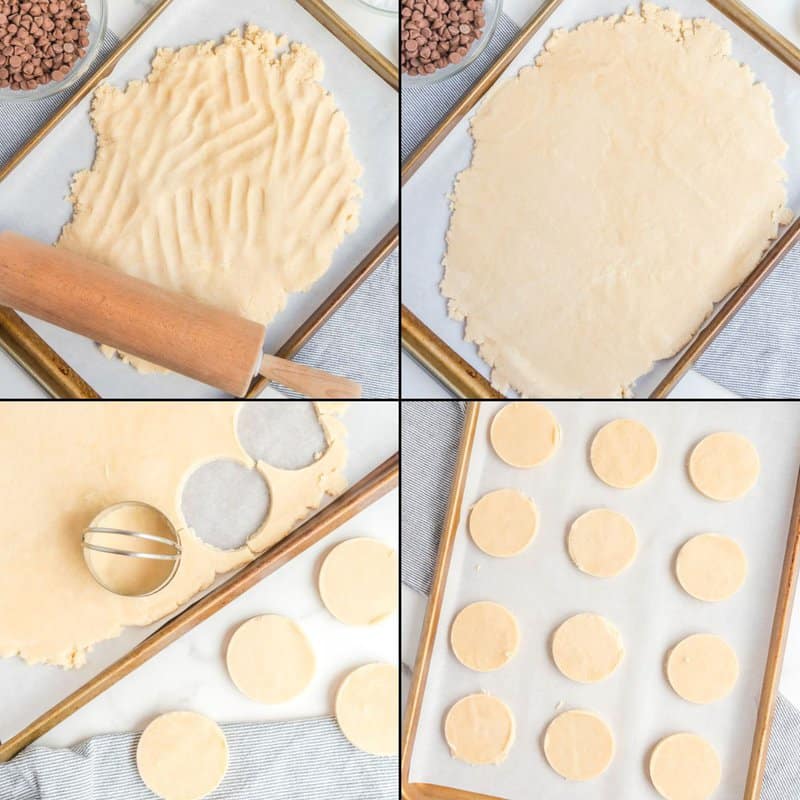
- Use a bowl scrapper to help transfer all the cookie dough onto the parchment paper-lined baking tray.
- Spread out the dough with your hands and cover it with plastic wrap. Use a rolling pin to smooth the surface.
- Place the baking tray in the fridge for an hour to chill the dough. NOTE: You can keep the cookie dough like this in the fridge for up to three days.
To bake the cookies:
- After an hour, remove the chilled cookie dough from the fridge.
- Preheat the oven to 350°F.
- Line two more rimmed baking trays with parchment paper to use later.
- While the cookie dough is still stiff, punch out cookies using a two-inch round cookie cutter. Place each cut cookie onto the newly prepared baking trays, spacing them at least two inches from each other and the sides of the tray. Re-roll any extra cookie dough to make more cookies.
- Bake the cookies until the edges brown slightly, around ten minutes.
- While the cookies are baking, place two wire racks on the counter.
- Place the hot trays on the wire racks and allow the cookies to cool to room temperature.
To prepare the peanut butter filling:
- Add the peanut butter, powdered sugar, and butter to the bowl of a stand mixer. If you don’t have a stand mixer, use a hand mixer instead.
- Whip the peanut butter filling on a medium setting until the powdered sugar and butter are worked into the peanut butter. The filling should be thick but still spreadable. Using room-temperature peanut butter and butter helps, but if the filling is too stiff to spread, add another tablespoon of butter and mix well.
- Spread the peanut butter filling on top of the cooled cookies.

To make the chocolate coating:
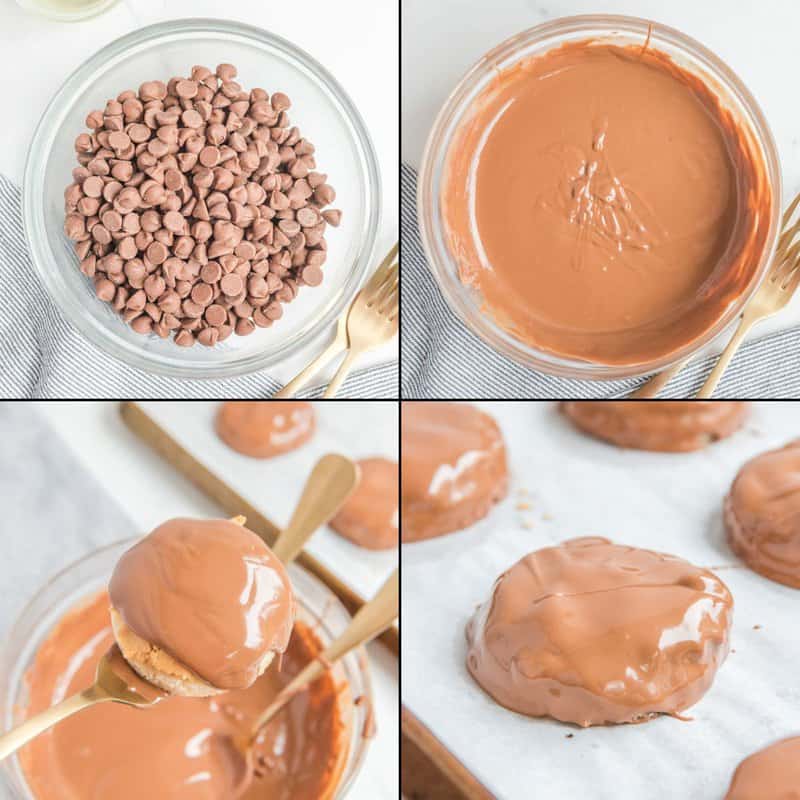
- Add the chocolate to a microwave-safe bowl.
- Microwave at 50 percent power for one minute. Stir well and add the vegetable oil. Continue to heat at 50 percent power in 30-second bursts until the chocolate is smooth.
To assemble a Tagalong cookie:
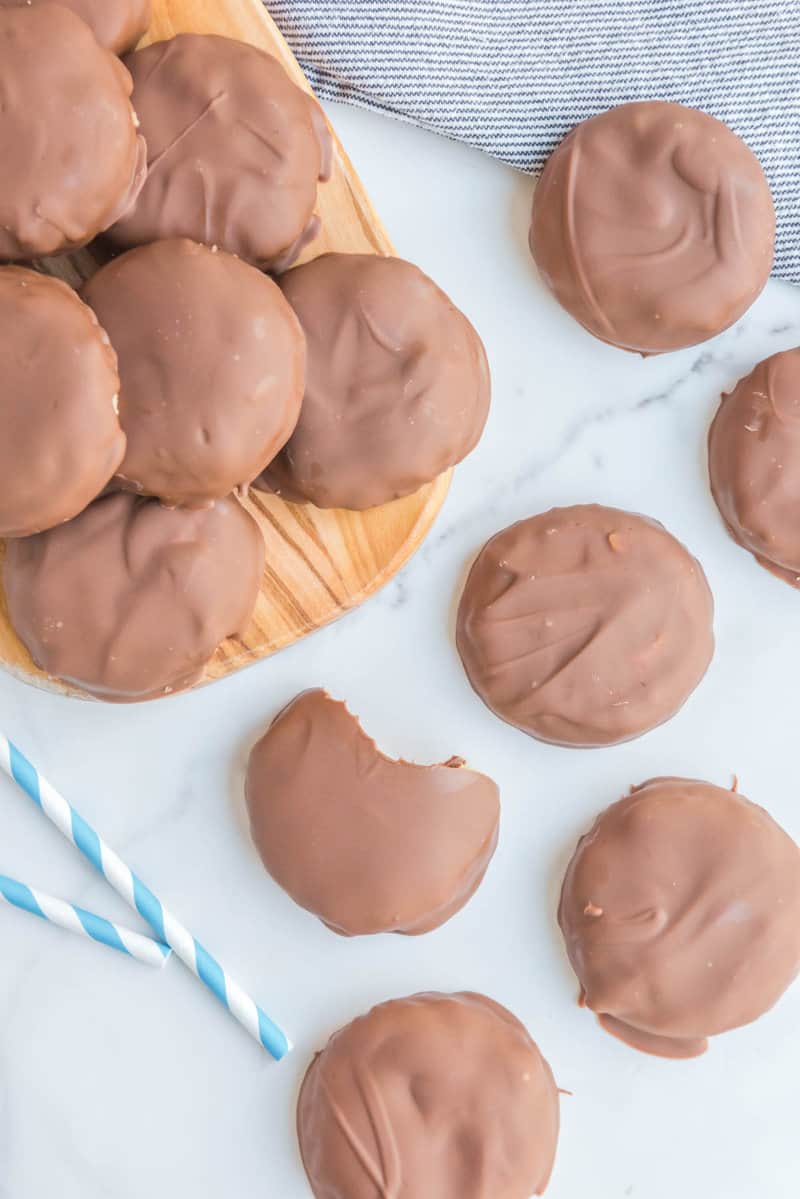
- Use a fork or a chocolate dipping tool to hold a cookie. Dip only the bottom portion of the cookie into the melted chocolate, using a spoon to pour the chocolate over the top. Let the excess chocolate drip and drain, then put the cookie on a parchment paper-lined baking tray.
- Repeat the coating process with the remaining cookies and pop the cookie-filled trays in the fridge until the chocolate hardens.
Homemade Girl Scout Tagalongs
Ingredients
- 2½ cups all-purpose flour
- 2 pinches salt
- 2 sticks unsalted butter
- 1 cup sugar
- 1 large egg
- 1 tablespoon vanilla extract
- 1½ cups creamy peanut butter
- 1 cup powdered sugar
- 2 tablespoons unsalted butter softened at room temperature
- 1 11-ounce bag milk chocolate chips
- 1 tablespoon vegetable oil
Instructions
- Line a large baking sheet with parchment paper.
- In a medium-sized mixing bowl, combine flour and salt.
- In a separate mixing bowl, cream the butter and sugar using an electric hand or stand mixer. Mix until smooth and fully combined.
- Add egg and vanilla. Mix again until smooth.
- Add flour mixture in, half at a time, and mix until fully combined and dough-like.
- Remove dough from the bowl and place it on the baking sheet with parchment paper. Using your hands, flatten the dough onto the baking sheet pressing downward.
- Use a rolling pin to smooth and roll out the dough to about ¼ – ½ inch thick.
- Place the rolled out dough in the refrigerator for 1 hour.
- When the chill time is complete, remove the dough from the refrigerator and preheat the oven to 350°F. Line 2 baking sheets with parchment paper.
- Using a 2-inch cookie cutter, cut rounds from the dough and place them onto the fresh sheet of parchment paper, 2 inches or more apart.
- Bake for 9 to 11 minutes or until the edge of the cookie becomes golden brown. The cookies will spread a bit during cooking.
- Allow the cookies to cool on the pan completely until they have reached room temperature.
- Once the cookies are at room temperature, prepare your peanut butter mixture.
- In a medium-sized mixing bowl, combine peanut butter, powdered sugar and butter using an electric hand or stand mixer. Mix until smooth and thick.
- Use a butter knife or your fingers to spread the peanut butter over the top of the cookie. It should mildly adhere to the cookie however you will want to press the mixture into the cookie, ensure it is fully covered. Do this for each cookie, one by one, place them back onto the baking sheet.
- When all cookies have a peanut butter layer on top, place the baking sheets into the refrigerator to chill for about 30 minutes.
- Near the end of the chill time, prepare the melting chocolate.
- Add the chocolate chips to a microwave safe bowl. Microwave on 50% power for 1 minute. When done, stir well and add the vegetable oil. Microwave on 50% power for 30 second intervals, stirring in between, until the chocolate is silky smooth.
- Use a fork and spoon to coat the cookie in chocolate. Hold the cookie on the fork and use the spoon to scoop the melted chocolate, pouring it over the cookie, coating it completely.
- Do this one by one, placing each cookie back on the sheet of parchment paper after it’s covered.
- When all cookies are covered in chocolate, place them back in the refrigerator for at least 1 hour.
Notes
Nutrition
Creative Variations to Try
While the classic Tagalong is perfect, don’t be afraid to experiment with these delicious twists:
Chocolate Options:
- Dark Chocolate: For a less sweet, more intense chocolate flavor
- White Chocolate: Creates a unique look and sweeter flavor profile
- Marbled Coating: Drizzle white chocolate over milk chocolate for visual appeal
Peanut Butter Variations:
- Crunchy Peanut Butter: For added texture in the filling
- Honey-Sweetened: Substitute some of the powdered sugar with honey for natural sweetness
- Nutella Swirl: Swirl in a small amount of Nutella with the peanut butter filling
Cookie Base Twists:
- Brown Sugar Base: Substitute brown sugar for white for a deeper flavor
- Chocolate Cookie: Add 2 tablespoons of cocoa powder to the flour.
- Almond Extract: Add ¼ teaspoon almond extract to the vanilla for a nutty accent
Finishing Touches:
- Peanut Topping: Sprinkle finely chopped peanuts on top of the wet chocolate
- Sea Salt Sprinkle: Add a tiny pinch of flaky sea salt on top while the chocolate is still wet
- Candy Stripes: Drizzle contrasting chocolate over the set coating in fine lines
What to Serve With These Chocolate-Peanut Butter Cookies
These homemade Tagalongs cookies are too fragile to dip, but they go well with milk, coffee, or tea. Some people like to freeze Tagalongs and enjoy them frozen.
Storage and Make-Ahead Tips
Room Temperature Storage:
If using chocolate chips with vegetable oil: Store in an airtight container in a cool place (below 70°F) for up to 3 days.
Refrigerator Storage:
Store in an airtight container in the refrigerator for up to 1 week. The chocolate coating helps prevent the cookies from drying out.
Freezer Storage:
- Place cookies in a single layer on a baking sheet and freeze until solid, about 1 hour
- Transfer to an airtight container or freezer bag with parchment between layers
- Freeze for up to 2 months
- Thaw in the refrigerator overnight or at room temperature for about 30 minutes
Make-Ahead Options:
- Complete Cookies: Best made within 1-2 days of serving for optimal freshness, but will keep well for up to a week in the refrigerator
- Cookie Dough: Can be made and refrigerated for up to 3 days before cutting and baking
- Baked Cookies: Can be made up to 3 days ahead and stored in an airtight container before adding peanut butter and chocolate
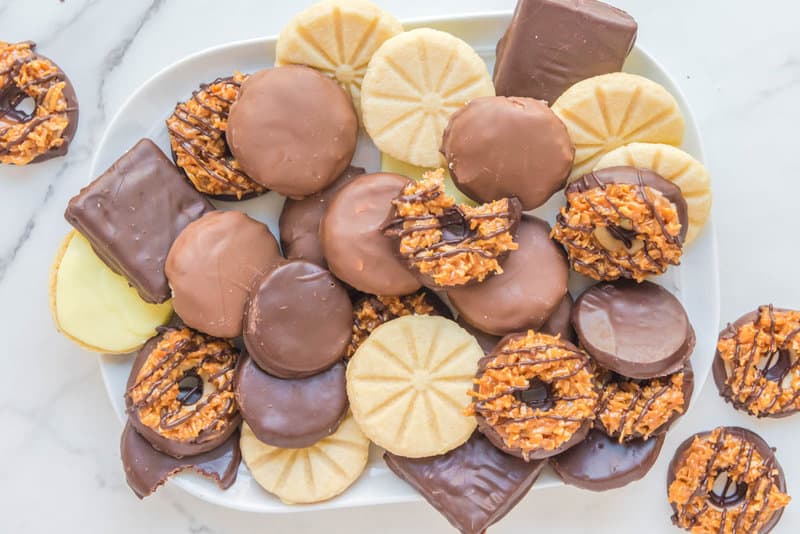
More Girl Scout Cookie Recipes
- Lemonades
- S’mores
- Samoas (Caramel Delites)
- Thin Mints
Favorite Cookie Recipes
- 3 Ingredient Peanut Butter Cookies
- Chocolate Crinkle Cookies
- Chocolate Sandwich Cookies
- Pecan Sandies
Favorite Peanut Butter Recipes
- Chocolate Peanut Butter Pie
- Homemade Reese’s Peanut Butter Cups
- Peanut Butter Ice Cream
- Peanut Butter Sauce for Ice Cream
Check out my easy cookie recipes and the best DIY recipes on CopyKat!
Leave a Reply