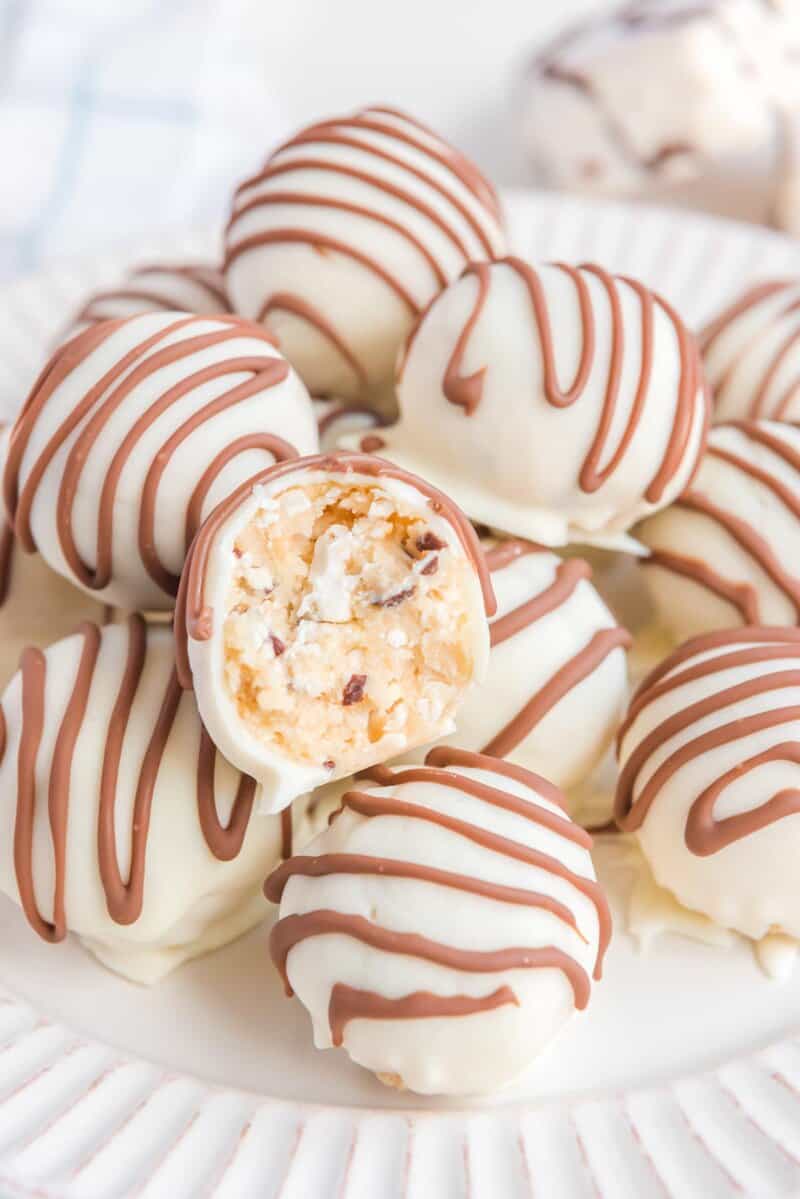
Little Debbie Zebra Cake Truffles (Easy No-Bake Recipe)
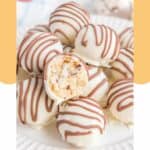


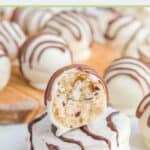

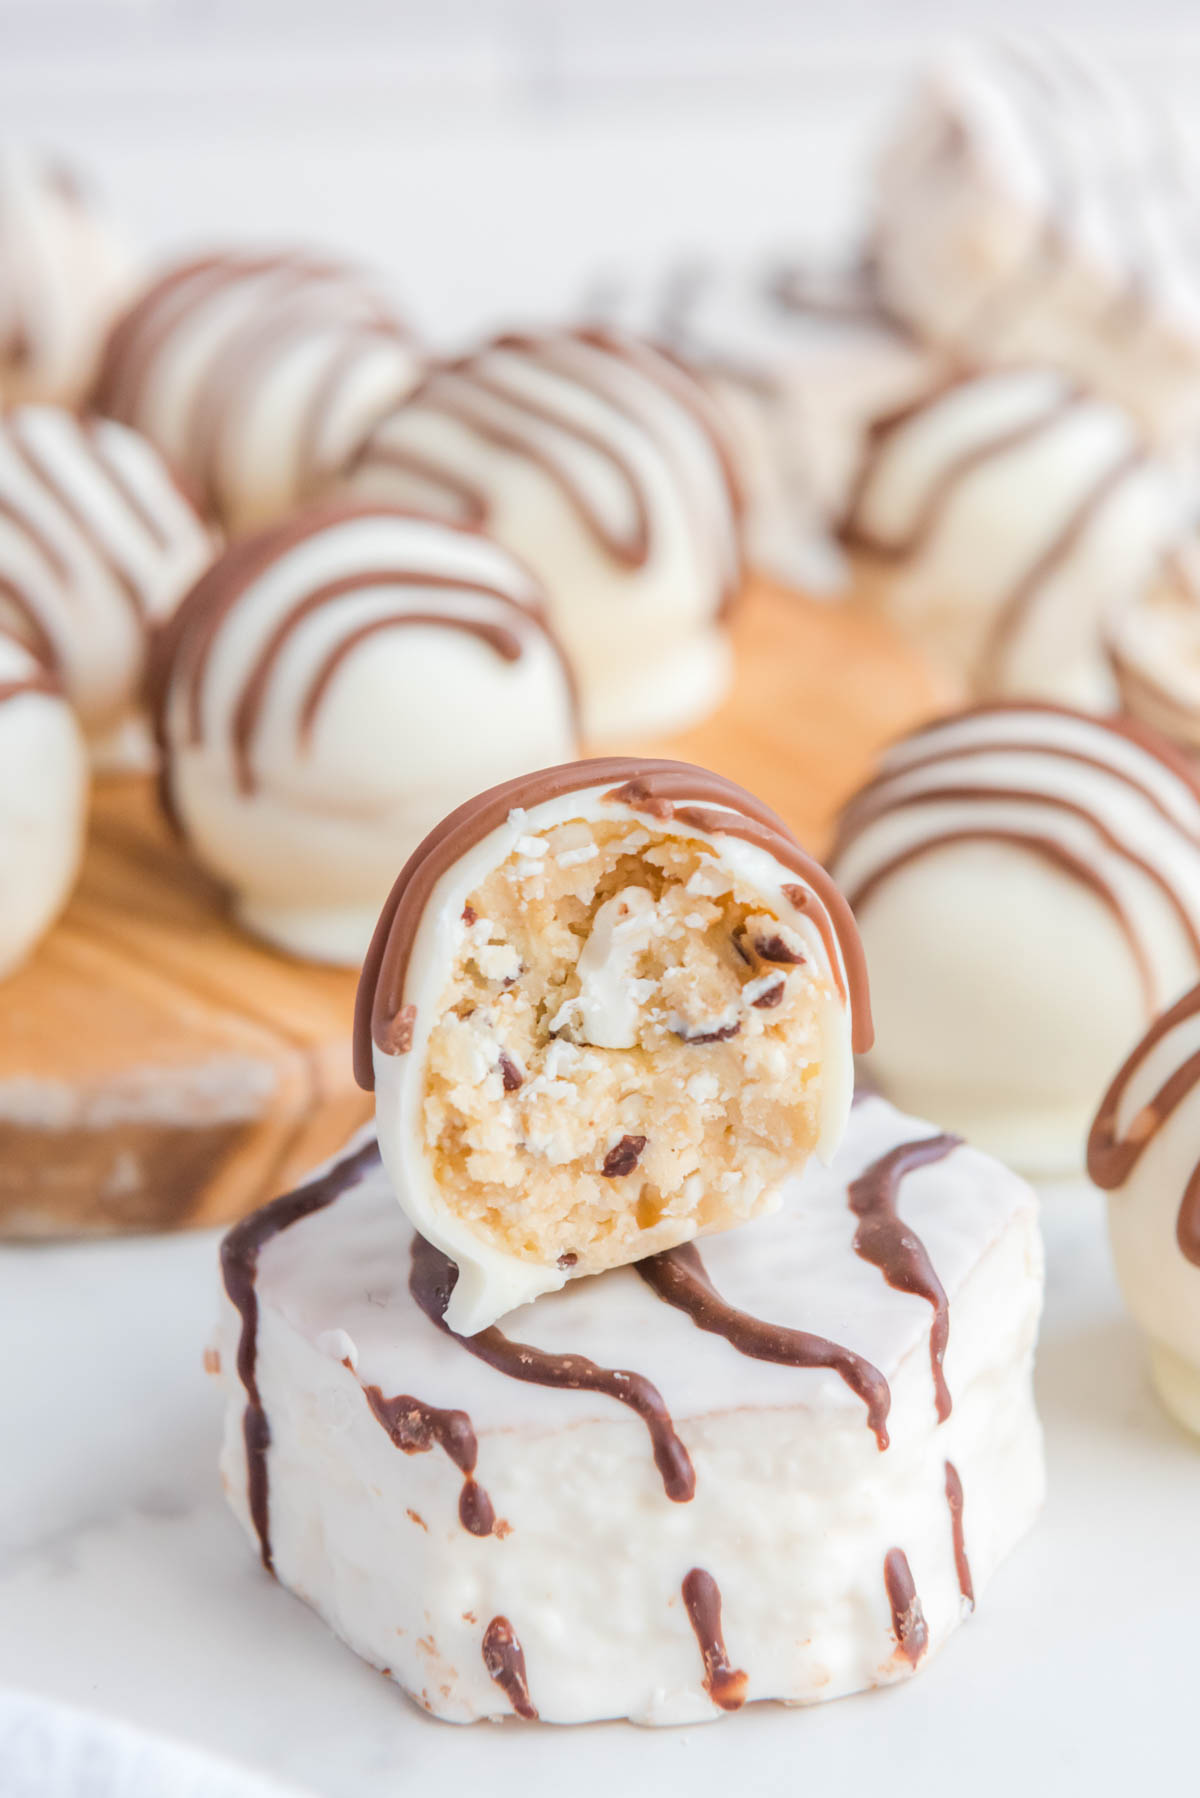
Transform childhood’s favorite snack cake into an elegant treat with these Little Debbie Zebra Cake Truffles. I discovered this brilliant shortcut when preparing desserts for my daughter’s birthday party and needed something impressive but simple. These no-bake truffles capture all the beloved flavors of zebra cakes while elevating them into sophisticated bite-sized confections. The combination of soft cake, creamy filling, and rich chocolate coating creates the perfect balance of nostalgia and indulgence. Best of all, you can make them in under 30 minutes of active time.
Add this site as a preferred Google source!
This post contains affiliate links. As an Amazon Associate, I earn from qualifying purchases.
Why You Should Try This Recipe
Why This Recipe Works
These truffles succeed because they use the perfect ratio of cake to cream cheese, creating a moldable mixture that holds its shape while remaining moist and flavorful. The chilling steps are crucial for achieving the proper texture and allowing the chocolate coating to set perfectly. Using quality melting wafers instead of regular chocolate chips ensures a smooth, professional-looking finish.
Ingredients You Will Need for Little Debbie Zebra Cake Truffles
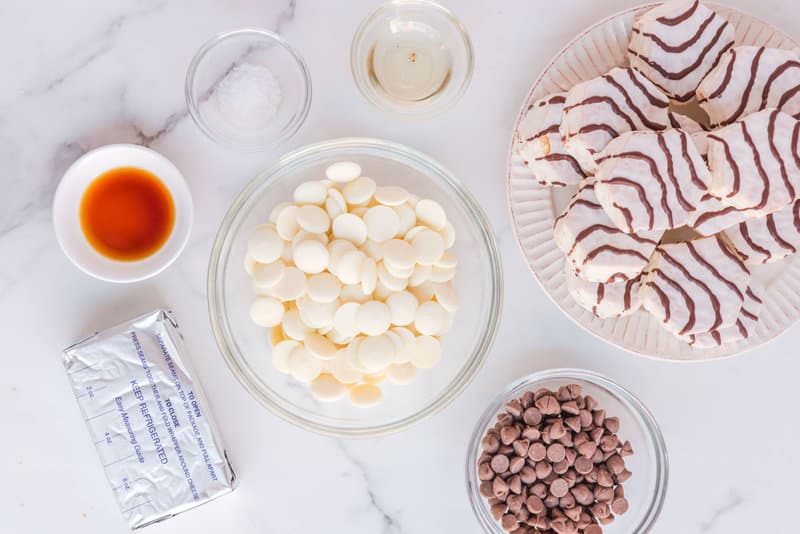
For the Truffle Base:
- Little Debbie Zebra Cakes – Provide the signature cake flavor and soft texture that forms the truffle foundation
- Cream Cheese – Binds the mixture together while adding richness and smooth texture
- Pure Vanilla Extract – Enhances the overall flavor and complements the chocolate notes
- Sea Salt – Balances sweetness and intensifies the chocolate flavors
For the Coating:
- White Chocolate Melting Wafers – Create a smooth, professional coating that sets properly
- Vegetable Oil – Helps achieve the perfect consistency for dipping and prevents cracking
- Milk Chocolate Chips – Provide the signature zebra stripe decoration
How To Make Little Debbie Zebra Cake Truffles
Here’s how to make Little Debbie Zebra Cake Truffles:
- Put parchment paper on a large cookie sheet and set it aside.
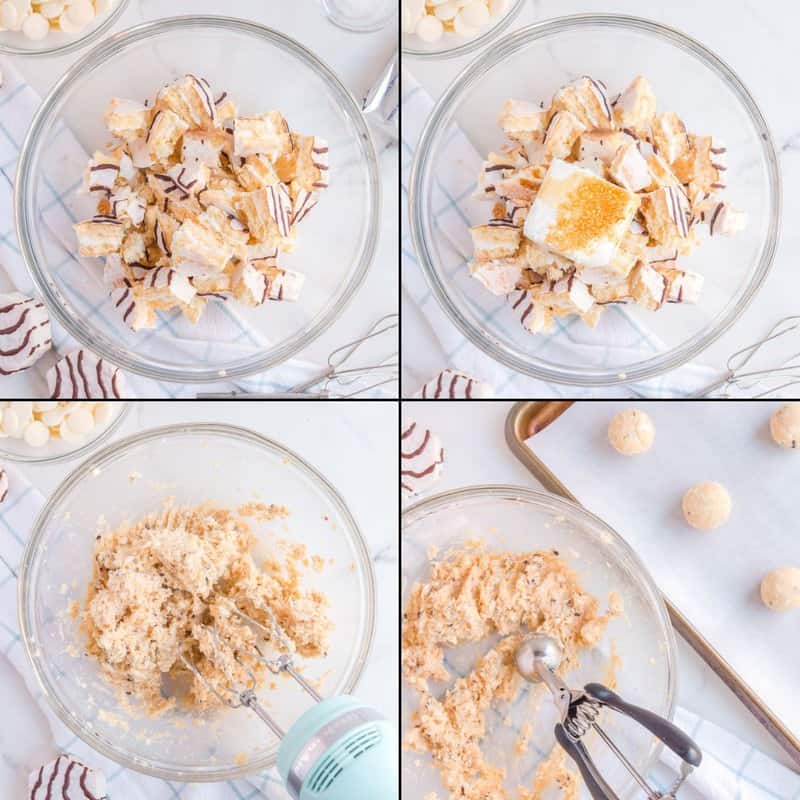
- Combine the Zebra Cakes in a large bowl by breaking them into large pinches. Add cream cheese, vanilla, and sea salt.
- Prepare the mixture with a stand or electric hand mixer until it is smooth and dough-like.
- Use a small cookie scoop to portion out the mixture. Roll the mixture into 1-inch balls. Roll each ball between your palms and smooth it out. You want a smooth ball that’s nice and round. Place each ball on the prepared cookie sheet.
- Put the cookie sheet in the fridge for an hour to chill.
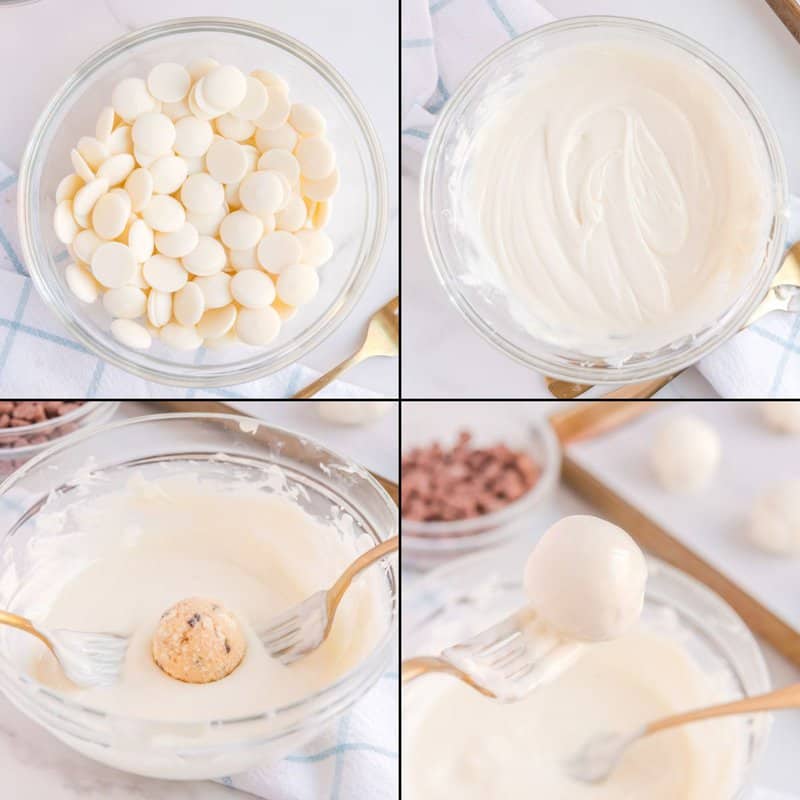
- Place your white melting chocolate in a microwave-safe bowl near the end of the chill time. Microwave for one minute on 50% power. Once done, add the oil and stir again. Microwave again in 30-second bursts, stirring between until the white chocolate candy mixture becomes silky smooth.
- With two forks or dipping tools, dip each truffle ball into the bowl of melted chocolate. Place each ball back on the baking sheet. Re-chill the baking sheet in the refrigerator for an additional hour.
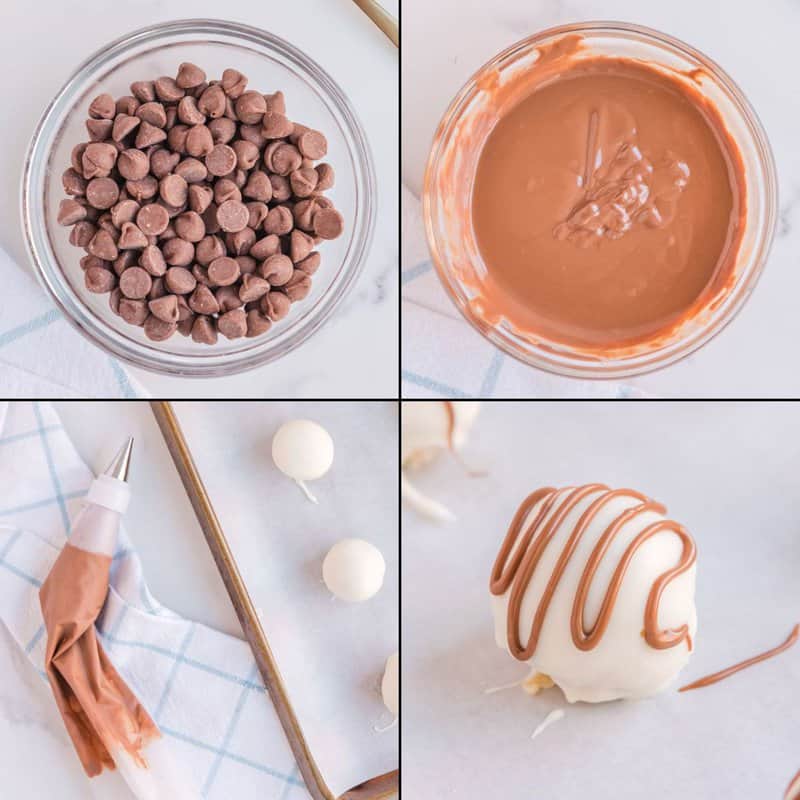
- Near the end of the chill time, melt the milk chocolate chips again. Add the melted chocolate using a piping bag with a small attachment. If you don’t have a piping bag, use a Ziplock bag with a small hole.
- Using the bag, add lines of chocolate to the truffles.
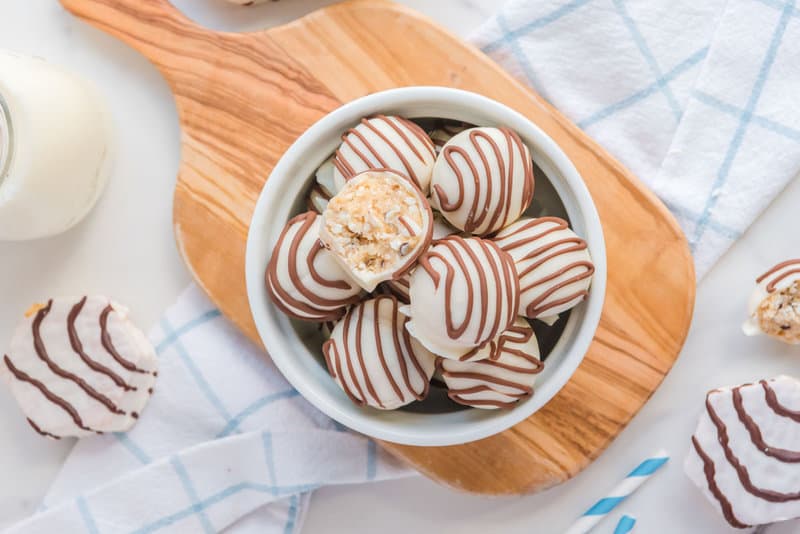
- Place the baking sheet in the refrigerator. Serve chilled after 30 minutes.
Top Tips for Little Debbie Zebra Cake Truffles
Here are just a few of my favorite top tips and tricks for making Little Debbie Zebra Cake Truffles even better!
- Ensure that the mixture in the cookie scoop is packed tightly.
- Blend the mixture using an electronic hand mixer or a stand mixer with a paddle attachment. Mixing by hand alone will not achieve the best results.
- Use wafers made from white chocolate Ghirardelli to achieve the best results for this recipe.
- Avoid cracking or melting by storing the Little Debbie Zebra Cake Truffles in the refrigerator.
- Make festive Christmas Zebra Cake truffles using Little Debbie Christmas Tree Cakes and red candy melts instead of white ones.
- If you want cake pops, insert cake pop sticks into the balls after dipping them in the white chocolate.
Sweet and delicious, these truffles are a must-try! The extra chocolate makes them taste just like Zebra Cakes.
How to Store Little Debbie Zebra Cake Truffles
You can store Little Debbie Zebra Cake Truffles in airtight containers or Ziploc baggies for up to five days. When you prepare this treat, there may not be any leftovers. It rarely takes long for them to disappear at my house.
Wrap your Little Debbie Zebra Cake Truffles tightly in plastic wrap or foil before placing them in an airtight container or freezer bag. A frozen Little Debbie Zebra Cake Truffle is the best way to cool off on a sweltering summer day. Eat them slightly frozen or at room temperature.
What Can You Serve with Little Debbie Zebra Cake Truffles
Little Debbie Zebra Cake Truffles pair well with a cold glass of milk to complement the chocolate and cream. Of course, you can also make a chocolate milkshake to serve with your snack cake. Or add your Little Debbie Zebra Cake Truffles to the blender for an extra-special treat.
Of course, you can enjoy these truffle snacks with a side of your favorite ice cream. You can also serve Little Debbie Zebra Cake Truffles as a dessert treat with coffee at the end of a meal. So, enjoy these truffle cake balls whenever you need chocolaty goodness. Test caramel drizzle or toffee sprinkles to add more pizazz to your favorite delectable and fun treat.
Storage Instructions
- Refrigerator Storage: Store in airtight containers for up to 5 days. Layer between parchment paper to prevent sticking.
- Serving Method: Serve chilled or at room temperature. Remove from refrigerator 10 minutes before serving for optimal texture.
- Freezing: Wrap individually in plastic wrap and freeze for up to 2 months. Thaw in refrigerator before serving.
Favorite Cookies and Treats Recipes
- Cake Mix Cookies with Butter
- Cranberry Bliss Bars
- Hello Dolly Bars
- Lindt Chocolate Truffles
- Old Fashioned Oatmeal Cookies
- Pecan Sandies Cookies
Popular Dessert Recipes
- Banana Split Cake
- Blueberry Cream Cheese Pie
- Earthquake Cake
- Heath Bar Cake
- Lemon Lush Dessert
- Toll House Pie
- Turtle Pie
Check out my easy candy recipes and the best dessert recipes on CopyKat!
Plus you’ll get great new recipes from us every week!
Little Debbie Zebra Cake Truffles – No-Bake Easy
Ingredients
- 6 Little Debbie Zebra Cakes
- 4 ounces cream cheese softened at room temperature
- 1 teaspoon vanilla extract
- 1 pinch sea salt
- 10 ounces white chocolate melting wafers
- 2 tablespoons vegetable oil divided use
- 1/2 cup milk chocolate chips
Instructions
- Line a large baking sheet with parchment paper.
- In a large mixing bowl, break the Zebra Cakes into pieces. Add the cream cheese, vanilla, and sea salt. Mix with an electric mixer until smooth and dough-like.
- Scoop the mixture with a cookie scoop and use your hands to roll each scoop into a smooth, round ball, about 1 to 1½ inches in diameter. Place each ball on the prepared baking sheet and refrigerate for 1 hour.
- Near the end of the chill time, place the white chocolate melting wafers into a medium-sized, microwave-safe bowl and microwave on 50% power for 1 minute. Add 1 tablespoon of vegetable oil and stir. Return to the microwave and heat in 30-second intervals on 50% power, stirring in between, until the chocolate is silky smooth.
- Using two forks or dipping tools, dip each truffle ball into the melted chocolate, covering it completely. Allow any excess chocolate to fall off before placing it back on the baking sheet. Refrigerate the chocolate-coated truffles for another hour.
- Near the end of the chill time, melt the milk chocolate chips in the microwave following the same method used for the white chocolate.
- Add the melted chocolate to a piping bag with a small round attachment. You can also use a plastic zip-top bag with a corner cut off to create a small hole. Working one at a time, pipe stripes of milk chocolate onto the truffles by moving the bag back and forth over each truffle. Refrigerate for at least 30 minutes before serving.


REVEALED Olive Garden Copycat Recipes
yes, you CAN make it at home! I’ll show you how.