Starbucks Cake Pops


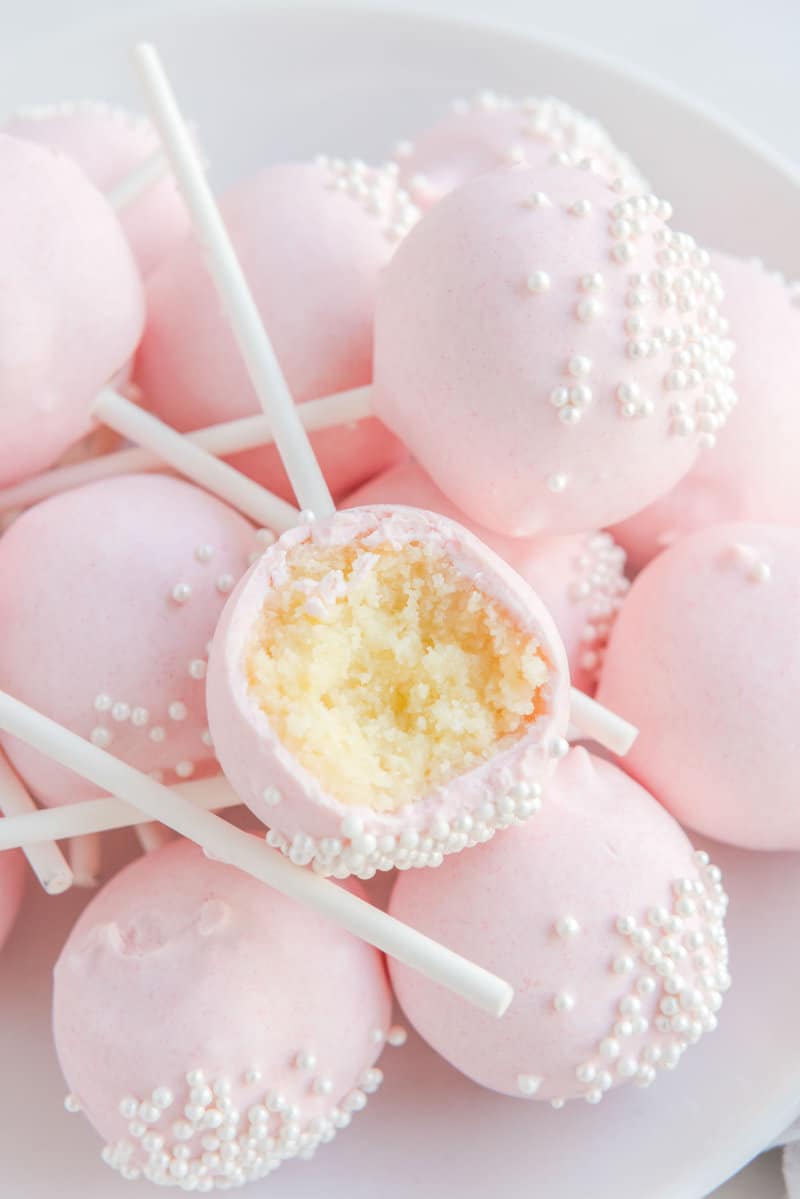
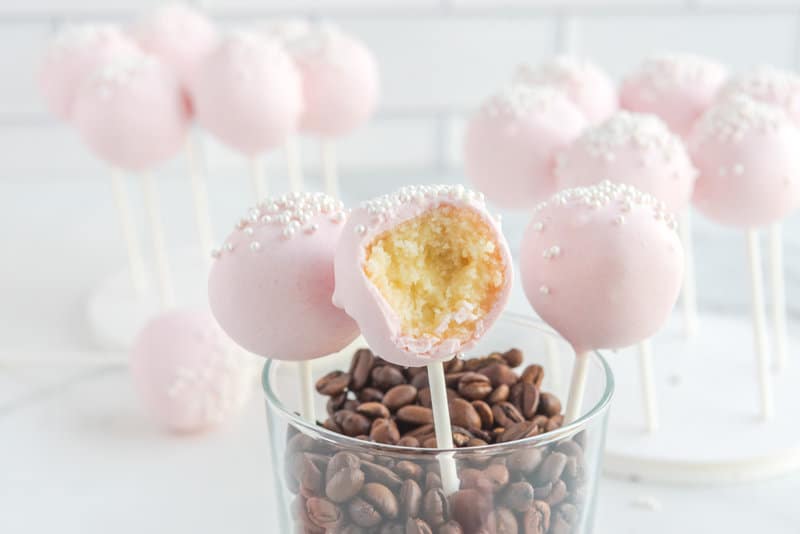
Skip the coffee shop line and create these adorable pink Starbucks cake pops in your kitchen! These bite-sized treats combine moist white cake with creamy vanilla frosting, wrapped in a pretty pink candy shell with sugar pearls. Homemade versions are more economical, but you can customize them for any celebration or holiday. Kids love helping decorate these sweet treats, making this recipe perfect for family baking days. The best part? This sweet treat tastes even better than the originals!
This post contains affiliate links. As an Amazon Associate, I earn from qualifying purchases.
What makes Starbucks Cake Pops so good?
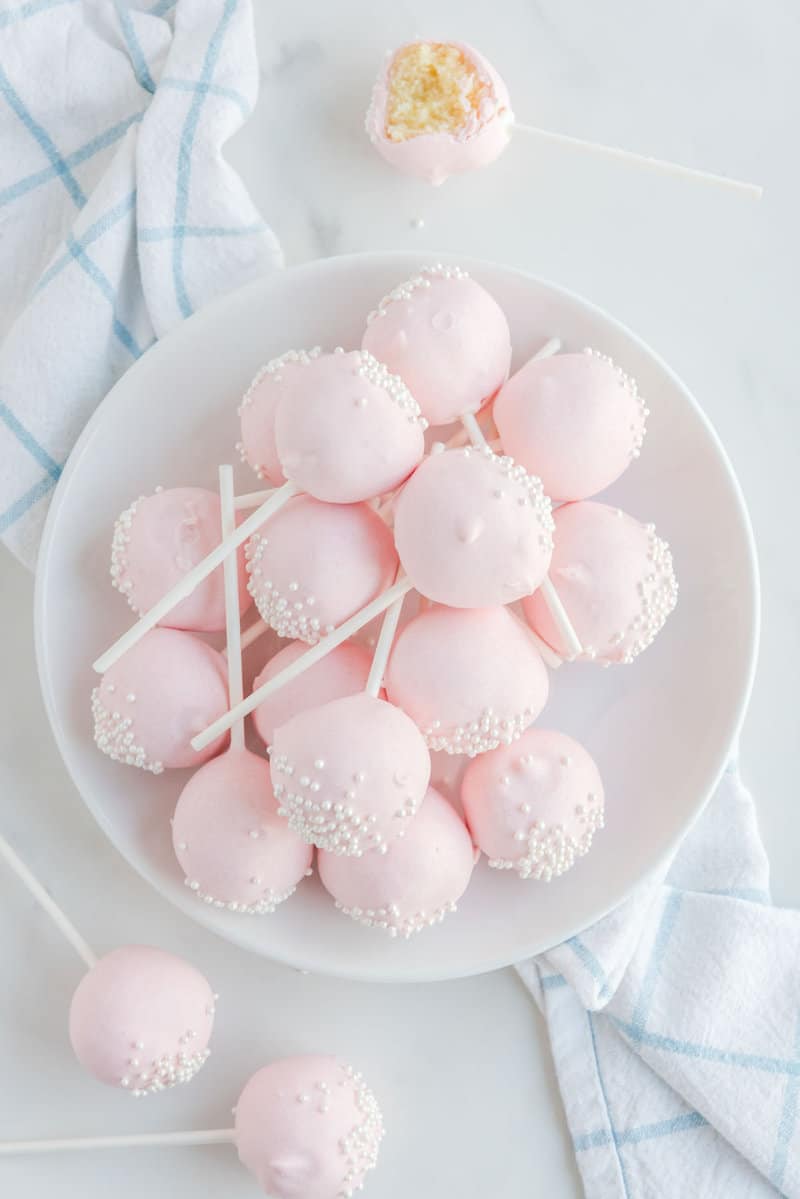
Copycat Starbucks Cake Pops are just as adorable as they are delicious. These bite-sized treats have a light pink candy coating studded with tiny sugar pearls and a soft center of classic white cake crumbs and creamy vanilla frosting.
It’s a fun, on-the-go way to satisfy your sweet tooth or the perfect gift for someone you care about.
Why you should try this Starbucks cake pop recipe
The secret to perfect cake pops lies in the proper cake-to-frosting ratio. This recipe achieves the ideal balance, creating cake balls that hold their shape without being too dry or sticky. Chilling the mixture thoroughly before coating will give you professional-looking results. Adding vegetable shortening to the candy melts creates a smoother consistency that’s perfect for dipping.
These trendy cake pops may look straight out of a boutique bakery, but they’re pretty simple to make. This is the perfect recipe to get your children excited about baking. Young kids will love to decorate (and eat) Starbucks Cake Pops.
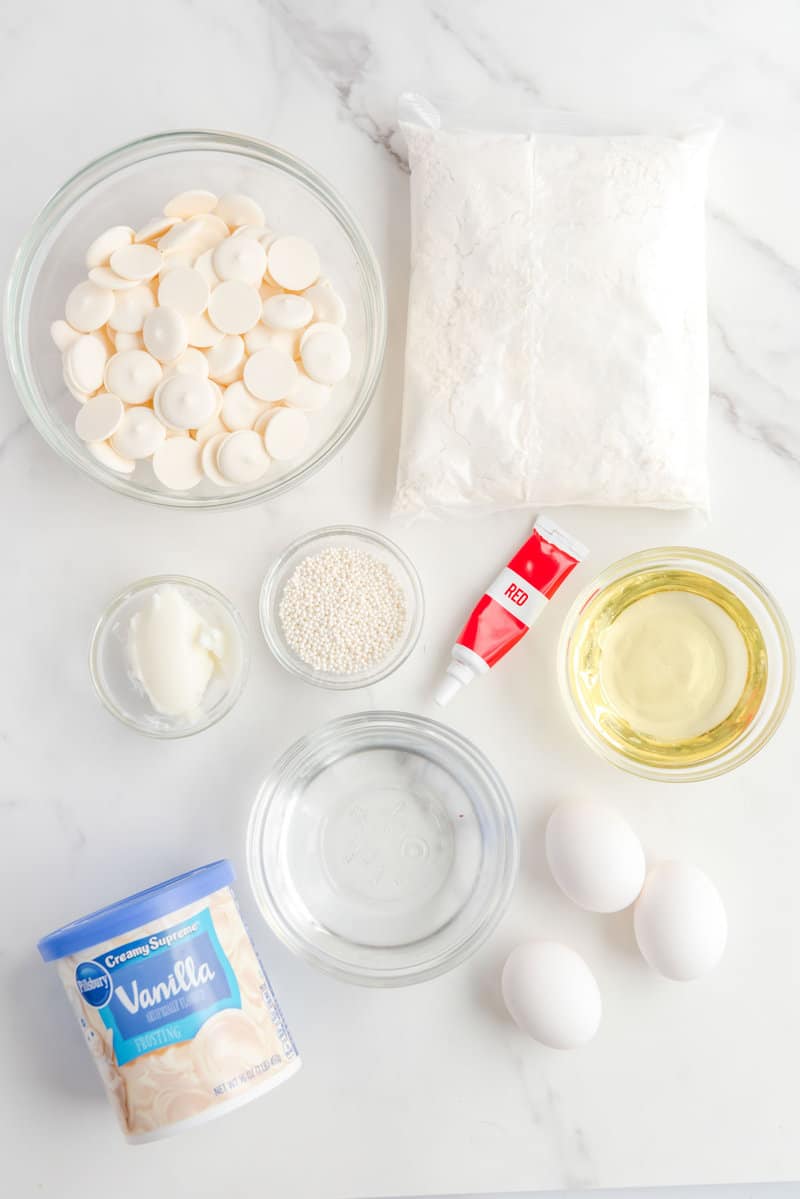
Starbucks Cake Pop ingredients
- White cake mix – Vanilla cake forms the base of the cake pop for that classic Starbucks flavor
- Eggs – Provide structure and richness to the cake
- Vegetable oil – Creates a moist texture in the cake
- Water – Hydrates the dry ingredients in the cake mix
- Vanilla frosting – Binds the crumbled cake and adds creamy sweetness
- Light pink candy melts – Creates the signature smooth, colored outer shell. You can use white chocolate candy melts
- Vegetable shortening – Thins the candy coating for easier dipping
- Sugar pearls – Adds the decorative finish that makes these look authentic. White nonpareils also work well
Equipment needed for this cake pop recipe
- Cake pop sticks – Essential for the classic lollipop presentation
- Large cookie scoop or meatball maker – Creates uniformly sized cake balls
- Cake pop stand – Helps display and dry the finished pops (optional)
- Microwave-safe bowl – For melting the candy coating
- Baking tray – For chilling the cake balls
- Wax paper – Prevents sticking during chilling
- Tall, narrow glass – Makes dipping easier
You can use different colors of candy melting wafers and sprinkles for holidays, baby showers, or other special occasions. If you choose to color white candy melting wafers, be sure to use gel food coloring and not liquid food coloring.
Special Equipment You May Need
You’ll want to have a few unique items on hand for the best results. But don’t shy away from this copycat Starbucks Cake Pop recipe if it’s not available. There are alternatives.
- Cake pop sticks and wrappers make your treats look professional. You can use lollipop sticks, popsicle sticks, or leave out the sticks entirely and call them Cake Truffles!
- A large cookie scoop or meatball maker works well to portion the cake mixture.
- A cake pop stand will help you display your pops beautifully, but they are unnecessary. If you don’t have a cake pop stand, you can stick the cake pop sticks into a piece of Styrofoam or in a jar filled with sugar.
How to Make Copycat Starbucks Cake Pops
To make the cake balls:
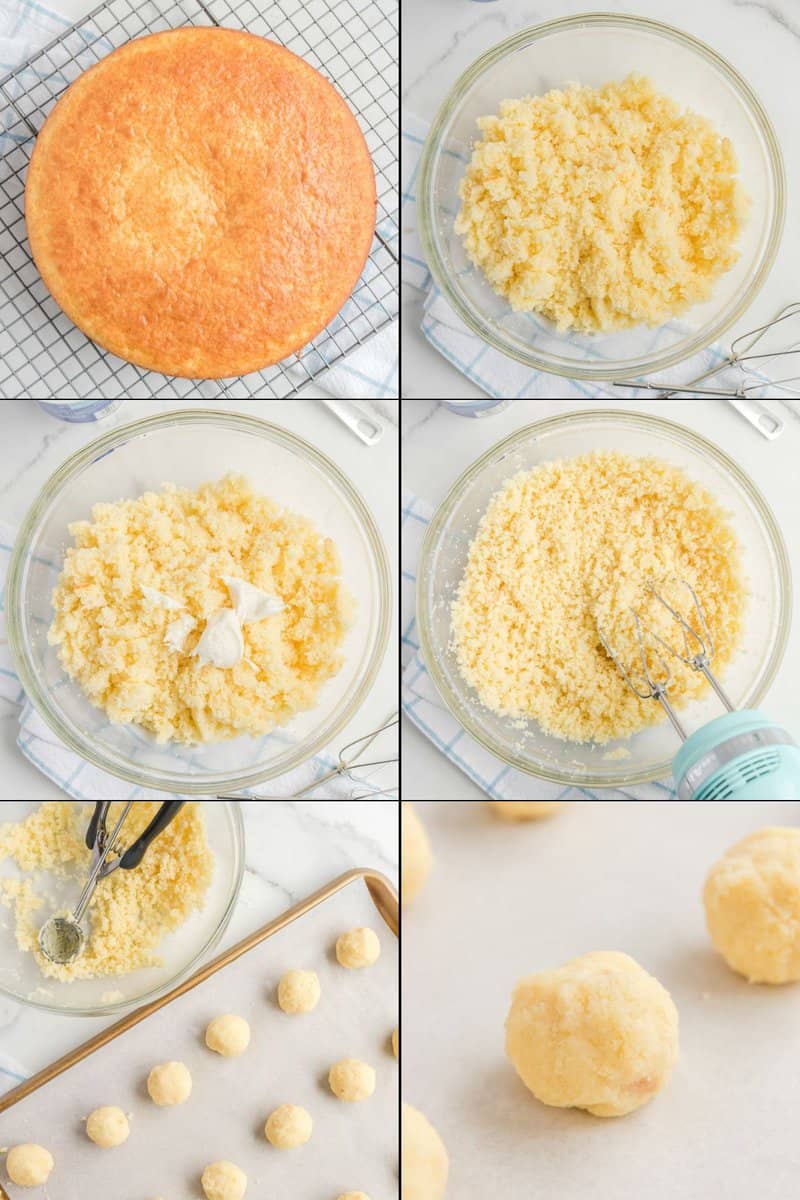
- Bake the cake according to the directions on the box.
- Cool the cake in the pan on a wire rack until completely cool.
- Remove the cake from the pan, then use a serrated knife to remove any browned bits.
- Use your fingers to break up the remaining cake into a large bowl. The smaller the pieces of cake, the better.
- Add the vanilla frosting to the mixing bowl, then use a rubber spatula to work it into the crumbled cake.
- Line a baking tray with wax paper and set it aside.
- Roll the cake mixture into golf-ball-sized portions and place them on the wax paper-lined baking tray.
- Continue rolling until no cake mixture remains.
- Cover the baking tray with plastic wrap and chill for at least three hours. Re-rolling the cake mixture balls halfway through the chilling time will create a smoother appearance.
To add the stick to the Starbucks Cake Pops:
- Take the baking tray with the chilled cake balls from the fridge and place it on the counter.
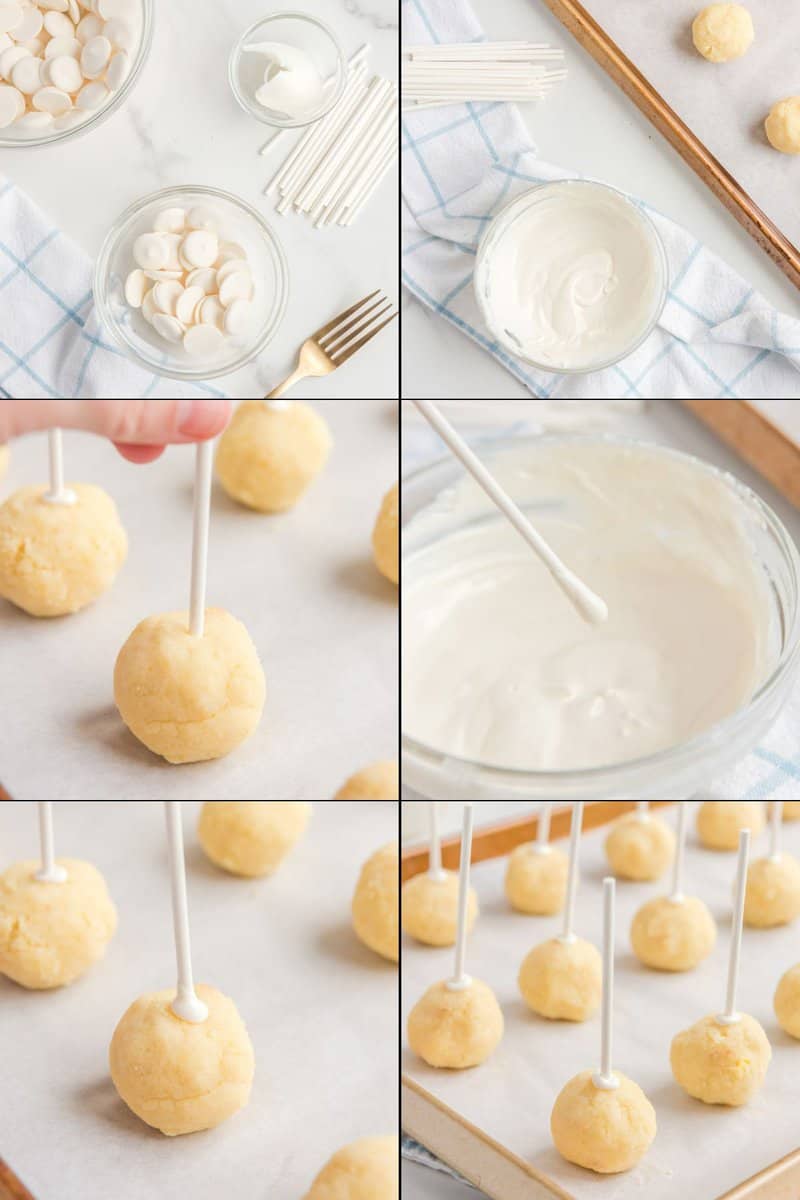
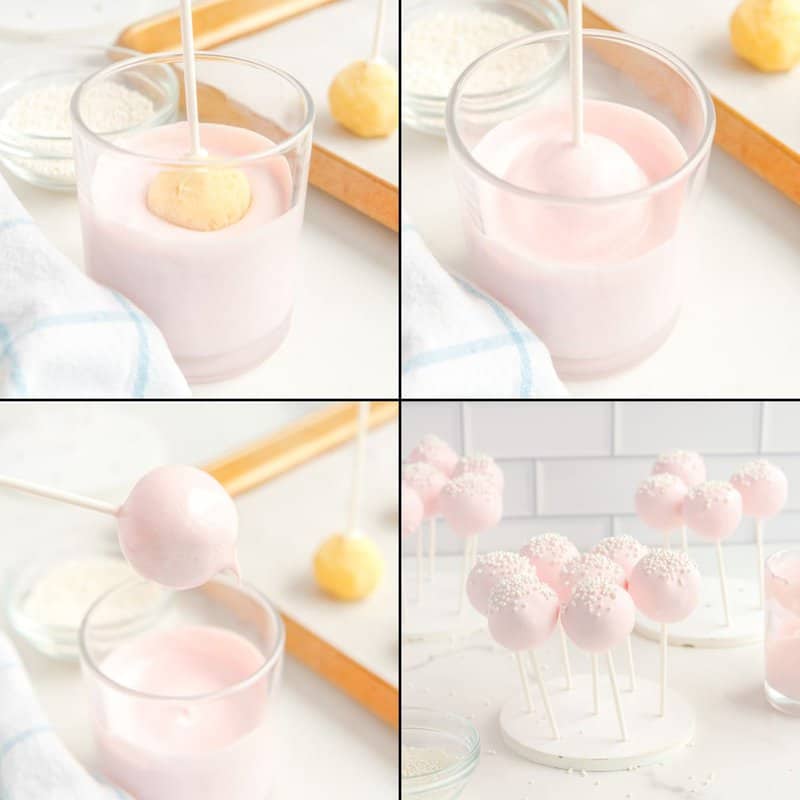
- Poke a cake pop stick halfway through each ball to form a hole. Remove the stick and repeat for each cake pop ball.
- Heat about a half-cup of candy melting wafers in a microwave-safe bowl at 50% power for a minute.
- Stir in half a tablespoon of vegetable shortening. Return the candy melting wafer to the microwave and heat for an additional 30-second interval at 50% power. Stir. Continue heating and stirring until the candy coating is smooth.
- Dip about a half-inch of the tip of a cake pop stick into the melted candy coating. Stick the dipped end of the stick into the holes in the cake mixture ball and place the cake pop back onto the wax paper-lined baking tray. The melted candy will help secure the cake ball to the stick.
- Repeat with all the remaining cake balls.
- Return the cake pops to the fridge for at least 30 more minutes.
To finish making the Starbucks birthday cake pop:
- Melt the remaining candy melting wafers as above.
- Add the gel coloring if needed.
- Stir in the coloring until it’s uniform.

- Pour the melted candy coating into a tall, narrow glass to make dipping easier.
- Dip a cake pop into the coating and decorate it with sugar pearls or sprinkles. Place the decorated cake pop on the stand. After dipping the remaining pops, chill them until the coating sets.
- Wrap the cake pops in plastic and store them carefully.
Homemade Starbucks Cake Pops: Better Than The Original
Equipment
Ingredients
- 1 box classic white cake mix prepared according to package directions, cooled
- 4 to 5 tablespoons vanilla frosting
- 10 ounces light pink candy melting wafers divided use
- 2 tablespoons Crisco vegetable shortening divided use
- round white sprinkles
Instructions
- Shave the brown edges off the cake. In a large mixing bowl, crumble the remaining cake with your hands, or preferably with an electric mixer. Add the frosting and mix to combine.
- Line a large baking sheet with parchment paper. Scoop the cake mixture with a cookie scoop and use your hands to roll it into tight, smooth, round balls. If the cake mixture does not stay together even after you’ve compressed it, add an additional tablespoon of frosting to the mix. Place each ball on the prepared baking sheet and refrigerate for at least 3 hours.
- Remove the baking sheet from the refrigerator and poke each ball with a cake pop stick, sticking it about halfway through each ball and then removing it.
- Add about 1/2 cup of the melting wafers to a microwave-safe bowl. Microwave on 50% power for 60 seconds. Add 1/2 tablespoon of shortening and stir gently. Return to the microwave and heat in 30-second intervals on 50% power, stirring in between, until the wafers are melted and silky smooth.
- Dip one tip of a cake pop stick into the melted wafers, about 1/2 inch deep. Then place the covered tip of the stick into the hole in the cake ball you created earlier. Repeat with a new cake pop stick for each cake ball. Refrigerate for 30 minutes before proceeding.
- Near the end of the chill time, prepare the remaining candy wafers. Repeat Step 4 using the remaining wafers and shortening until the mixture is silky smooth. Pour the melted wafers into a deep bowl or cup for dunking.
- Remove the cake pops from the refrigerator. Working one at a time, dunk a cake pop into the melted wafers and carefully pull it out, allowing the excess to drip off. Place the cake pop into a cake pop stand with the stick pointing downward and immediately top with sprinkles. Repeat this process for each cake pop.
- Refrigerate the cake pops for another 30 minutes before serving.
Notes
Nutrition
What to Serve With Starbucks Cake Pops
These colorful treats look fantastic when displayed as part of a dessert buffet, but they are just as delicious when you give your guests two or three to nibble on with a cup of coffee or tea.
How to Store Cake Pops
You can keep the wrapped cake pops on the counter at room temperature for up to five days.
For longer storage, place them in an airtight container in the freezer for up to two months. Let the cake pops thaw before serving.
More Starbucks Copycat Recipes
- Chai Tea Latte
- Sous Vide Eggs
- Starbucks Blueberry Muffins
- Starbucks Blueberry Scones
- Starbucks Vanilla Scones
- Starbucks Chocolate Drinks
- Starbucks Cold Brew
- Starbucks Medicine Ball Tea
- Starbucks Refreshers
Fun Cake Recipes
Check out more of my easy cake recipes and the best copycat Starbucks recipes on CopyKat!


REVEALED Olive Garden Copycat Recipes
yes, you CAN make it at home! I’ll show you how.